Puncture Protection Belt vs Tire Liner: Do You Need Both on Your E-Bike?
Quick answer
You don’t need both. A built-in puncture protection belt or an aftermarket tire liner can each stop most flats on an e-bike. The choice comes down to your existing tires, how much rolling resistance you’re willing to accept, and whether you want to add weight to the wheels. For most daily riders, a tire with an integrated belt is the simpler, more effective choice. If you already own unprotected tires and want to add flat protection without buying new rubber, a liner makes sense—but expect a real 5–10% range penalty.
Comparison framework
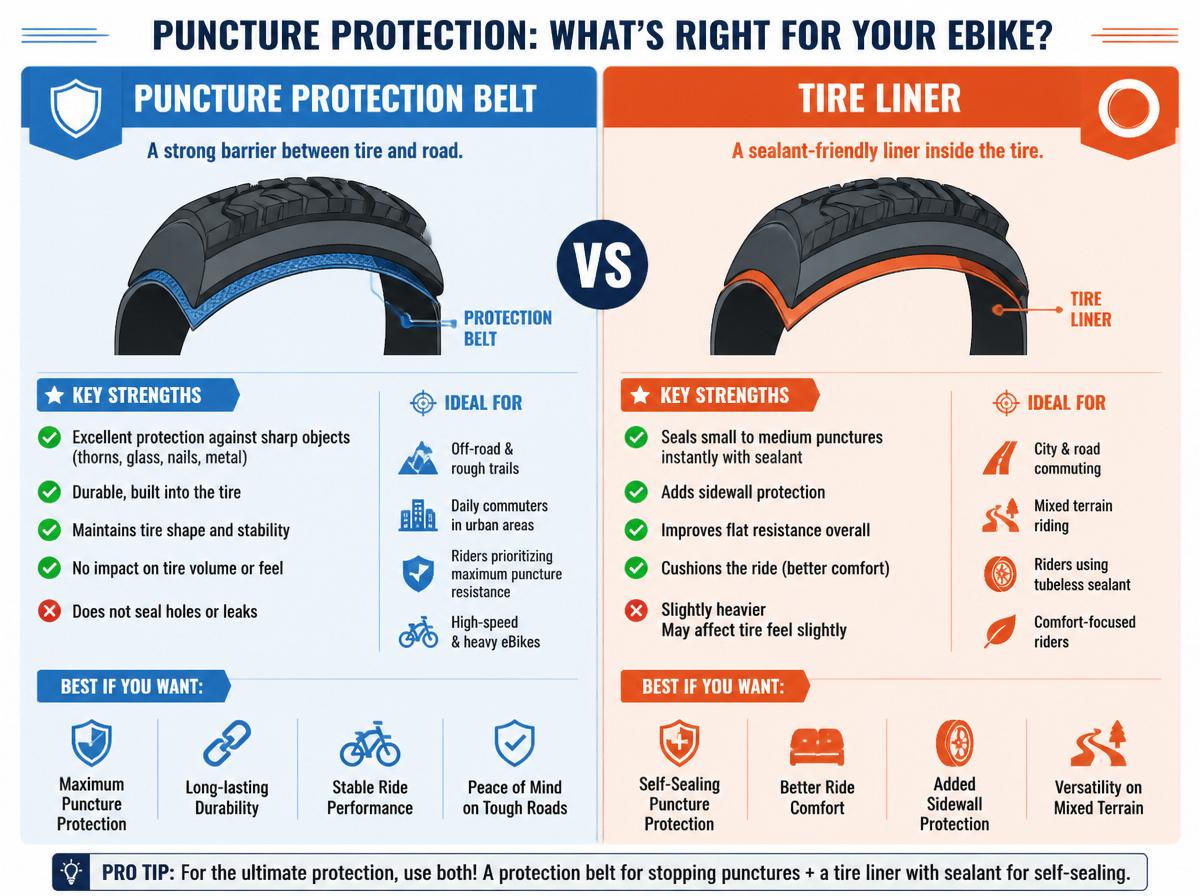
How built-in belts and aftermarket liners differ
Built-in puncture protection belts are embedded inside the tire casing during manufacturing. The belt sits directly under the tread and spreads the force of a sharp object before it reaches the inner tube. Schwalbe SmartGuard, Continental SafetyPlus, and Kenda Puncture Guard are common examples.
- Zero installation effort – The protection is part of the tire. Mount the tire and ride.
- Weight added per tire – Typically 100–200 g compared to the same tire without a belt. On a rear wheel that already carries a hub motor, this extra unsprung mass can reduce suspension responsiveness.
- Low to moderate rolling resistance increase – The belt adds some stiffness. On a pedal-only climb the drag is noticeable, but with motor assist it’s rarely an issue.
- Fits any rim – As long as the tire size matches your wheel, no compatibility problems. No need to worry about internal clearance.
Aftermarket tire liners are flexible strips placed between the tire casing and the inner tube. They add a physical barrier against punctures from below.
- Weight per wheel – Roughly 150–300 g, depending on thickness and width.
- Higher rolling resistance – The liner slides against the casing and tube, creating friction. On a 20 mph commute this extra drag can increase power draw by 10–20 W, shortening range by 5–10%. On a 48V 14 Ah battery that normally delivers 40 miles, you’ll see around 36 miles.
- Installation hassle – You must partially mount the tire, insert the liner, align the ends, then fully seat the tire. A misaligned liner can bunch up and cause a vibration that feels like a flat.
- Compatibility required – Some rims with a tight bead seat or tubeless-ready profiles won’t work with thick liners. Remove the tube, place a ruler across the inside of the tire from bead to bead. If the distance is less than the liner’s stated maximum width, the liner will overlap and pinch the tube.
| Feature | Built-In Belt | Aftermarket Liner |
|---|---|---|
| Weight gain per wheel | ~100–200 g | ~150–300 g |
| Rolling resistance impact | Low to moderate | Moderate to noticeable |
| Installation effort | None (tire-only) | Moderate (must fit between tire & tube) |
| Compatibility | All rims (same tire size) | Must match tire width & rim profile |
| Replacement cost | Higher (buy new tire) | Lower (reuse liner over several tires) |
| Roadside repair time | Standard (remove wheel, patch tube) | +5–10 min (must remove liner to access tube) |
Best-fit picks by use case
Daily paved commuter or cargo rider – Belt preferred
If you ride on streets with glass, metal debris, or gravel, a tire with an integrated puncture belt offers the best balance of protection and low maintenance. The mild rolling resistance penalty is easily offset by the motor’s assist. Tires like the Schwalbe Marathon E-Plus with SmartGuard last thousands of miles without extra fitting effort. You also get a built-in reflective sidewall on many models—a safety bonus for night commuting.
Off-road or trail rider – Skip both or go tubeless
Sharp rocks and roots can cut even thick belts. A liner adds weight that hurts handling on climbs and descents, and the rolling resistance penalty matters more when you pedal with the motor off. Most trail e-bike riders switch to tubeless setups with sealant to self-seal small punctures. If you stick with tubes, carry a patch kit and a spare tube instead of adding a liner.
High-speed or long-range commuter – Liner as retrofit
If you already own tires without a built-in belt and want more flat protection without buying new rubber, an aftermarket liner is the most cost-effective upgrade—about $15–$25 per wheel. However, the range hit is real: that 40-mile commute may drop to 36 miles. If you ride a Class 3 bike at 28 mph, the extra friction pulls more power at higher speeds. If range is critical every day, replacing your tires with belt-equipped ones is a better long-term investment.
Fat tire e-bike – Check internal clearance first
Fat tires (4 in / 100 mm or wider) have enough internal volume to accommodate a liner, but many fat-tire rims have a tight bead seat. A thick liner can prevent the tire from seating evenly, causing a wobble at speed that cannot be balanced. On an e-bike hitting 20+ mph, that wobble can force you to pull over. Test-fit a liner on a spare rim before committing. Some riders prefer tires with a built-in puncture layer to eliminate the fitment issue entirely.
Trade-offs to know
Weight versus protection
Every gram of added belt or liner is unsprung mass, reducing suspension responsiveness and increasing force on spokes and nipples. On a rear hub motor wheel, that extra weight gets multiplied by the motor’s rotating mass. A rear tire with a 300 g liner plus a 9 lb hub motor puts more stress on spokes than a 150 g belt tire plus the same motor. If you weigh over 250 lb or ride on potholed streets, spoke tension checks every 300 miles become more important.
Range versus peace of mind
A liner’s friction costs miles. On a standard 48V 14 Ah battery delivering 40 miles per charge, dropping to 36 miles means you lose nearly 10% of usable range. If your commute is exactly 15 miles each way, that margin disappears and you may need to charge more often. A belt tire, by contrast, typically costs only 2–3% range, making it easier to maintain your usual route without recharging mid-week.
Roadside repair time
Flats still happen with either solution. With a belt tire, you remove the wheel, unseat the tire, patch the tube, and remount—standard procedure, about 10–15 minutes. With a liner, you must fish the liner out, patch, and then reinstall it carefully. Add 5–10 minutes to the repair. On a rainy evening commute or behind a blind curve, that extra time is both inconvenient and hazardous. Carrying a spare tube pre-loaded with a liner as a complete assembly cuts repair time but requires that you own two full sets.
Cost over time
A single belt tire costs $40–$80 and lasts 2,000–4,000 miles depending on tire compound and road surface. An aftermarket liner costs $15–$25 and can be moved from tire to tire, lasting through several tread lives. Over 4,000 miles, one belt tire at $60 costs about 1.5 cents per mile, while a liner reused across three sets of $30 tires totals $15 + $90 = $105, or about 2.6 cents per mile. The belt tire saves money in the long run if you would otherwise buy unprotected tires anyway. But if your current tires are still in good shape, a liner costs less upfront and delays the need for new rubber.
Related Articles
- E-Bike Insurance Guide: What Is Covered, Costs & Do You Actually Need It?
- How to Use Your E-Bike Battery On/Off Switch Safely
- Himiway vs. mokwheel: a fat tire e-bike comparison

Ryan Williams has spent over 8 years testing, repairing, and writing about electric bikes. He has personally ridden and reviewed 150+ e-bike models from brands like Lectric, Aventon, Rad Power, Super73, and dozens more.
Before founding EBIKE Delight, Ryan worked as a bicycle mechanic for 5 years at independent bike shops across California, where he specialized in e-bike conversions and electrical system diagnostics. He holds a Certificate in Electric Vehicle Technology from the Light Electric Vehicle Association (LEVA).
Ryan’s work has been cited by Electric Bike Report, Electrek, and BikeRumor. When he is not testing the latest e-bike on California backroads, he is in his workshop tearing down batteries and controllers to understand what makes them tick — and what makes them fail.
Areas of Expertise
E-bike performance testing and real-world range verificationBattery diagnostics, charging best practices, and safetyBrand comparisons: Lectric, Aventon, Rad Power, Super73, and moreError code troubleshooting across major e-bike systemsE-bike laws, registration, and compliance by state
Ryan believes every rider deserves honest, hands-on information — not marketing hype.